
This weekend I went to the Peak District together with a few other people from my department over the day. It was a spontaneous thing planned en route. We ended up alternating between chasing around the countryside looking for geocaches and photographing. It was a cloudy day, but towards the second half of the afternoon it started to clear up and we got some blue skies. We did plenty of jumping shots on top of high cliffs and rocks. One of them stood out to me, there was something about the pose hanging in midair and the background that tickled my creativity. I wanted to add wings, and a visual idea started to form. Icarus in Edale.
It turned out to be trickier than I thought to find the right bird wings. My photo library is not annotated, but eventually I found a photo from my time in Amsterdam. The seagull was a bit small, but I decided to try it out. I used free transform (⌘T) to align the wings properly then used the quick selection tool (together with refine edges) to create a layer mask. I used soft light and overlay as blending modes on two copies of the wing layer to create the effect that I wanted.
The photo could have been done at this point, but I decided I wanted to remove a bit of the cliff under my feet to further enhance the illusion. Also I needed to add a bit of sky to fit in the wings properly. My first attempt failed as I was naïvely using the content aware brush, which created too soft a transition between the remaining rocks and the background. The second time round I used quick selection tool to select the rocks that I wanted to keep, then inverted the selection. This way I could paint in with the clone tool, which only updated the selected region, without risking destroying the rocks. This fixed the transition, but the ground started to look fake with lots of repetitions. So went back with content aware fill and the content aware brush to regenerate parts of the ground. As long as I stayed away from the rock-grass boundary they did a good job.
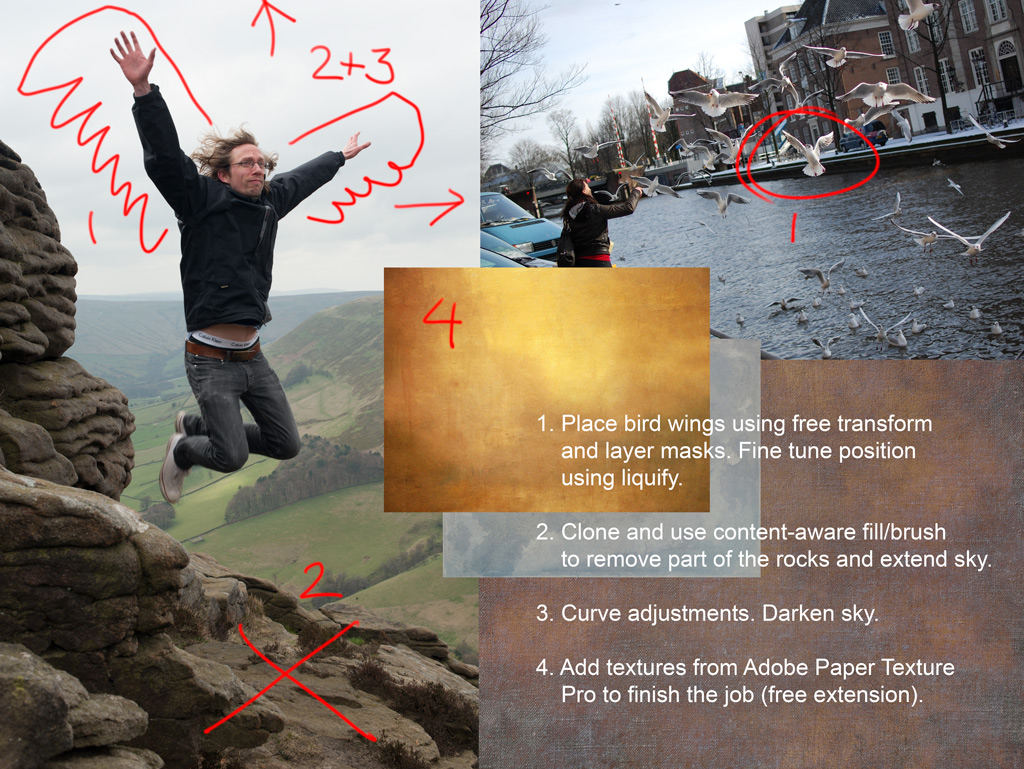
I was quite happy with the result and decided to see if I could get some feedback on the photo. I have started to visit a Swedish Facebook group called “Svenska fotoklubben” where people post their photos to get comments from other photographers. I have only posted there a few times. It is good to get a second pair of eyes looking at your creations and I got some very helpful tips. The first suggestion was to darken the sky to make it more dramatic, and increase the contrast against the wings. The second thing to do was to change the perspective of the wings so they better aligned with the arms, here liquify came to the rescue. I think this is the first time I really appreciated what it could do. Another very helpful comment was that it looked funny with the hedges stopping half way, so I cloned them in all the way to the rocks. Lastly I removed the Calvin Klein logo from my underwear!
I started writing on the blog, then decided I wanted to do one more thing. The photo looked a bit too clean. Adobe provides some free plugins for Photoshop, one of them is Adobe Paper Texture Pro, which gives you a library of background textures to mix in with your photos to add a bit of structure. After some trial and error I found three textures that I blended with the image to get the final result that you see above.
– Johannes
Be First to Comment